In today's hyperconnected world, ensuring high availability (HA) of services is no longer a luxury—it's a necessity. This is especially true when working with container orchestration systems like Kubernetes and K3s. At DevsOperative, we believe in the power of knowledge and the sharing of best practices. Hence, this guide aims to demystify high availability in Kubernetes and K3s, presenting a clear path to set up your cluster to be a truly fault-tolerant system.
Understanding High Availability and Its Significance
High availability is a paramount concept in cloud computing. It guarantees that a system remains operational even if one or more of its components fail. This uninterrupted access to services ensures business continuity, minimizes downtime, and contributes to an excellent user experience.
When it comes to Kubernetes, high availability is achieved by establishing a control plane with three or more nodes. In case of a node failure, another node takes up the leadership role and functions as the primary controller. This design ensures that the overall cluster continues to operate seamlessly, regardless of individual node failures.
Steps Towards Achieving High Availability in K3s
Setting up K3s to be highly available involves a few significant steps, and having prior experience with K3s installations can certainly make the process smoother. Here's an easy-to-follow roadmap:
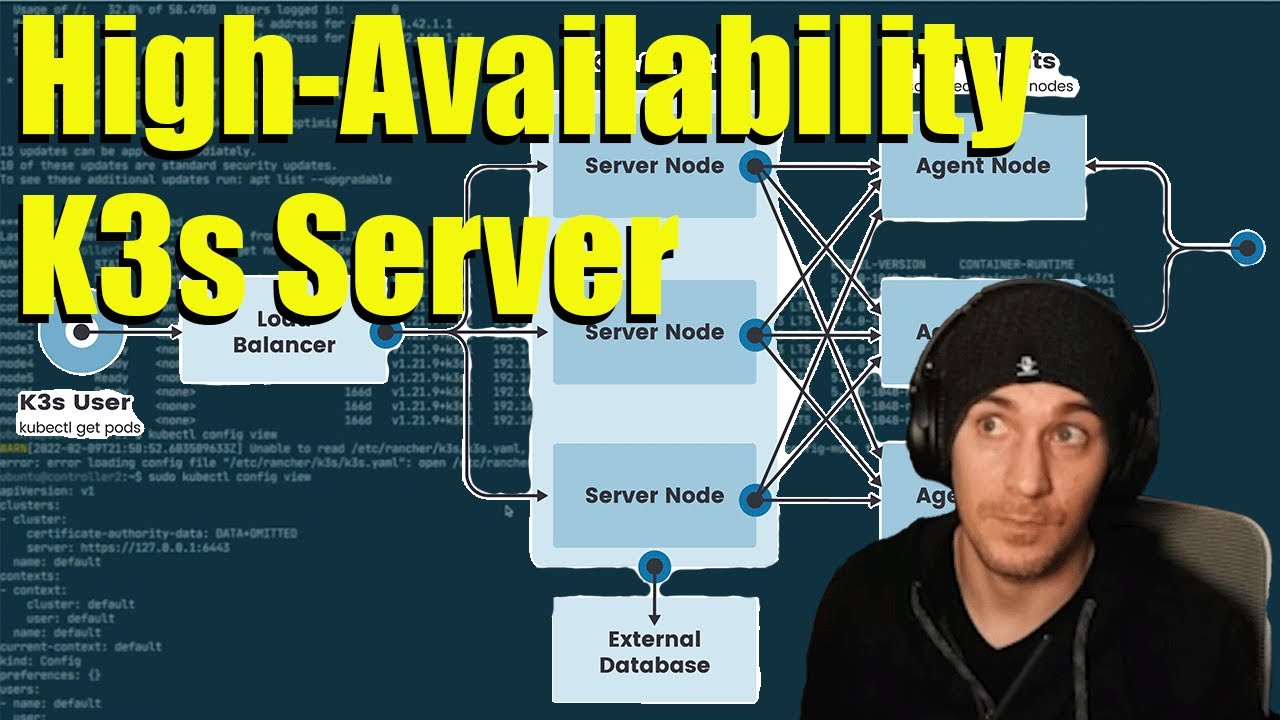
Initiate a Primary Controller: The first step in achieving high availability in K3s is creating a primary controller. This setup doesn't differ much from a single-node setup.
Join Secondary Controllers: Once the primary controller is up and running, you need to join secondary controllers to it. This is achieved by utilizing a specific flag that communicates to the other nodes the location of the primary node.
Activate Cluster: Launch a server node using the cluster-init flag. This flag facilitates clustering and uses a token as a shared secret to join additional servers to the cluster.
curl -sfL https://get.k3s.io | K3S_TOKEN=SECRET sh -s - server --cluster-init
- Add Servers to the Cluster: Once the first server is launched, add the second and third servers to the cluster using the shared secret.
curl -sfL https://get.k3s.io | K3S_TOKEN=SECRET sh -s - server --server https://<ip or hostname of server1>:6443
At this stage, your cluster is configured to be highly available, ensuring that even if a controller goes down, the workloads continue to function, and new workloads can be scheduled.
Addressing the Elephant in the Room: Ingress
Having a cluster resistant to failure is an achievement worth celebrating. However, a key aspect that should not be overlooked is ingress. Ensuring high availability for your cluster does not inherently protect your applications from potential downtime, especially when they are exposed to the internet.
Fortunately, K3s comes bundled with ServiceLB, formerly known as Klipper Load Balancer. ServiceLB enables any service of type LoadBalancer to be exposed to the network outside your cluster. If you're more acquainted with MetalLB, you have the option to replace ServiceLB with it.
The following step in fortifying your network setup depends on your specific setup. Here's where you need to consider router configuration. This involves configuring your router to forward incoming traffic to the LoadBalancer's external IP. However, one of the challenges you might face here is handling a single IP failure. This is where we recommend the addition of a physical load balancer between your router and the cluster.
For instance, we have successfully implemented this strategy using HAProxy installed on an additional Raspberry Pi. This setup forwards traffic from ports 80 and